
Individuals with reports-only access to DataManager can create their own accounts using a Reporting Key
Important: If you did not receive an email message with a Reporting Key, check your blocked and/or spam email folders for a message from your Account Holder or from DataManager (no-reply@dm.riverside-insights.com). If you find it, add the email address to your list of safe senders. (Contact your IT specialist if you have not done this before or if you still cannot find the email containing the Reporting Key.)
To access reports using only a Reporting Key (without an existing DataManager account):
1. Open your web browser and enter the URL from your email (https://www.riversidedatamanager.com/BalancedManagement/user/signin).

2. Click the Create a new user with DataManager Reporting Key link. The Add DataManager Reporting User modal opens.
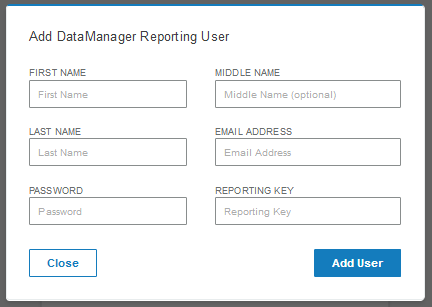
3. Complete the user information as follows:
Note: Fields with an asterisk (*) are required.
-
- In the name fields, type your first name, middle name (optional), and last name.
- In the EMAIL ADDRESS field, type your email address. This email address becomes your username.
- In the PASSWORD box, type a password. The password must be at least eight characters in length, must include at least one number, and cannot include your user name.
- In the REPORTING KEY box, type the Reporting Key supplied in the email.
4. Click Add User. The system activates your user account, and the Create a Report page opens.
Note: Your user account is automatically assigned the Digital Resource & Reporting Access role.
5. Do one of the following:
- If this is the only Reporting Key you received, you can now view the reports for the locations and students associated with the Reporting Key. See DataManager Reporting Help for information about creating and working with reports.
- If you received additional email messages with Reporting Keys, continue with step 6 below.
6. In the left navigation menu, click the Add DataManager Reporting Key link. The Add DataManager Reporting Key page opens.
7. Type a Reporting Key in the REPORTING KEY box, and then click Add Key. Repeat this step for each Reporting Key you received.
8. When you have added all your Reporting Keys, click the DataManager Reports button at the bottom of the page. The Reports Center opens to the Create a Report tab. From here, you can run different types of reports with different filters for your students' assessment results. See DataManager Reporting Help for information about creating and working with reports.