
Starting a New School Year
Head Administrators in easyCBM should communicate any changes to the system or district policy at this time.
Additionally, we recommend that you set and review your current system settings.
Step 1: Create and Upload Files
Follow the steps in Creating and Uploading Data Files under Resources, if using the nightly FTP upload or manually rostering. Three data files should be uploaded into the system—users, students, and teacher-student associations.
– Add any new staff to the User file, and delete staff no longer with the district.
– Notify new users how to log in, and provide their passwords.
– If enabling student passwords, unique passwords need to be added to the student file.
Clever and ClassLink users will log in through the easyCBM app with their synced rosters. If you wish to use Clever or ClassLink for SSO and rostering, please contact Riverside Insights support or data@service.riversideinsights.com.
Step 2: Review and Update System Settings
– Follow the Managing District-Wide Settings Quick Guide under Resources.
– Communicate to staff the benchmark window that has been set.
– Communicate which measures/subject(s) are required for screening.
– Communicate established risk level for students needing intervention.
Step 3: Review Building Setup under System Settings
Buildings are created in the user and student .csv files. However, you can change the teacher access level for each building, delete a building, or edit a building name by selecting the Buildings link under Setup.
If you make any changes to building names, remember to change your import files to avoid overriding changes you make manually.
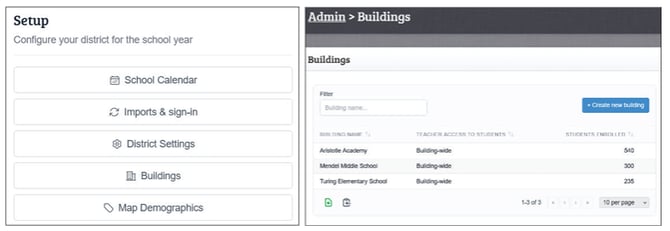
To change setup access for a building, select the building, and a pop-up window will appear asking you to choose between:
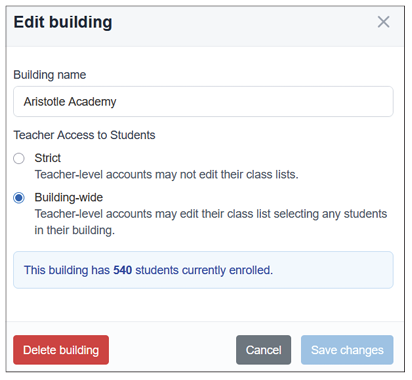
Strict: Teacher-level accounts may not edit their class lists. (Teachers are only able to see students associated directly with them.)
Building-wide: Teacher-level accounts may edit their class list, selecting any students in their
building. (This is useful if there are interventionists or a few users who are doing all the assessing for the building.)
After changing the level, hit the Save changes button. A confirmation pop up will appear once
changes are saved. If deleting a building, click the Delete building button. A building cannot be
deleted if students are enrolled in that building.
Step 4: Training
Have new users access the training under Resources or schedule refresher training. Provide a contact to teachers as to who to contact with questions. Riverside Insights can provide training. Please contact training@riversideinsights.com for options.
Step 5: Goal Setting
Remind teachers that student goals can be set at either the grade or current instructional level. The Percentile Quick Reference should be used to determine the appropriate score.
Step 6: Groups
Edit, delete, or add groups, as needed.
Under the Student tab, teachers can add new groups by clicking the Add Group button. If a
student is in the currently selected group, they will have a check next to their name. If the student is not in the group, their checkbox will be unchecked.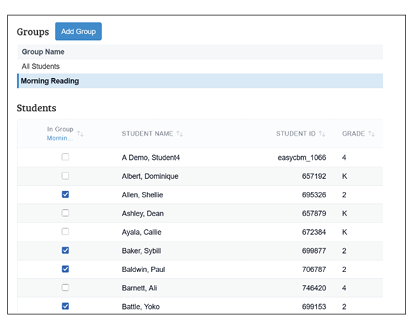
Step 7: Create Intervention Templates
Manage student instructional interventions by creating reusable intervention templates that can be applied to individual students or groups. District and Building Users can share intervention templates. Users can customize curricula and strategies used.